Here is a fun way to celebrate any occasion with a bowling pin cake! It's super easy. Seriously, if I can do it...YOU can too!
Step one: Use your all time favorite cake recipe. Mine is (and always will be) chocolate fudge! Make sure you make enough for two 9x13 cake pans. For my cake I used a box. Sometimes you just gotta keep it simple =)
Step two: Grease and flour your 9x13 cake pans.
Step three: Evenly distribute cake batter into the two pans.
Step four: Bake cakes using recipe or instructions from the back of the box.
Bakers tip: Don't always trust your oven. When I was baking this cake, I was up at our family cabin. I used the worlds oldest oven and I was in a much higher altitude than my home. I didn't want to take any chances, so I cooked it a little lower and a little slower.
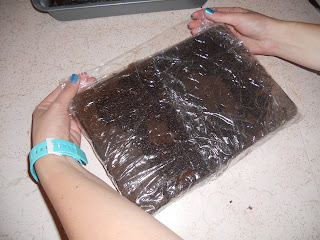
Step five: Let the cakes cool COMPLETELY & remove from pans! Then wrap in cling wrap. Place wrapped cakes in freezer until they become firm. It is almost impossible and not a very good idea to sculpt, cut or ice a cake that is to warm or soft.
Step six: While the cakes are in the freezer, cut out the shape of a bowling pin. You can print out a picture from the internet or just eye ball it. If you are eyeballing it like I did, it is best to fold your paper ( I used two pieces and taped them together) in half. This ensures a symmetrical shape. Also cut out the shape you'd like to use for the stripe. I wanted mine to have a straight bottom edge and then points on top like a crown.
Step seven: Place your paper bowling pin across your two cakes and cut around. Carefully remove excess cake. (You can save the excess cake to serve to guests too)
Bakers tip: Use your frosting as a glue. Because you are using two cakes, there will be pieces that aren't connected.
Step eight: Dirty ice the cake with white frosting. This will be just the first layer of frosting. It can also be called a crumb coat. After the first layer of frosting is all over, place cake back into the freezer for 15-20 minutes. Putting a second layer of white frosting ensures a clean cake.
Bakers tip: on the second layer, dip your frosting spatula or knife into a cup or warm water. Doing this helps make the frosting smooth.
Step nine: Once the cake is completely frosted use your stripe cut out and place over the middle/top of the cake. Then use sprinkles to color in stripe area. I used a squirt bottle to spray where I wanted the sprinkles to stick. Carefully pull back cut out. If there are any stray sprinkles don't try to wipe or pick off. Use a bit more frosting to cover them up.
Step ten: Wipe around edges of the cake to clean it up.Then you can transfer the cake to another serving platter. I chose not to transfer because it was already on the cabin's fanciest tray =)
After all your hard work, make sure you take pictures before you serve it up! We'd love to see your best bowling pin cake! Post your pictures on our company Facebook page!
Tools I used to decorate:
~bowling pin paper cut out
~stripe cut out
~3-4 cups of white frosting
~knife for frosting
~cup of warm water
~paper towels to clean up the edges
~squirt bottle
~red Sprinkles


Love this idea! Thanks for the step by step with photos! Love it!!!!
ReplyDelete